Saturday, February 18, 2012

did you just put 'sour cream' in THAT banana bread?


i've been craving a lot of carbs lately and noticed this week that the bananas on the counter were becoming really ripe:  you know it's ready for pitching in the rubbish bin or baking when the skins get really, errr, black.  it's the best when bananas are this way, not necessarily for eating alone, but for baking or cooking.  i knew i would be baking something with bananas but thought i'd get interesting this time by putting a twist on the typical banana bread.  this post is featuring my latest version of a baker's staple creation (borrowing a lot of pointers on the recipe from Allrecipes.com): banana bread that includes sour cream, lots of chopped nuts and mixed dried berries, and best of all, it's gluten-free!  don't worry:  sour cream is perfect because it gives the bread this muffin kind of moistness.  and yes, i like my breads 'chunky' and 'interesting' so i added tons of nuts and dried fruit so it almost looks like fruit cake minus the candies and over-done sweetness.  if you don't like either nuts or dried berries, you can easily omit both from the recipe without any problem!
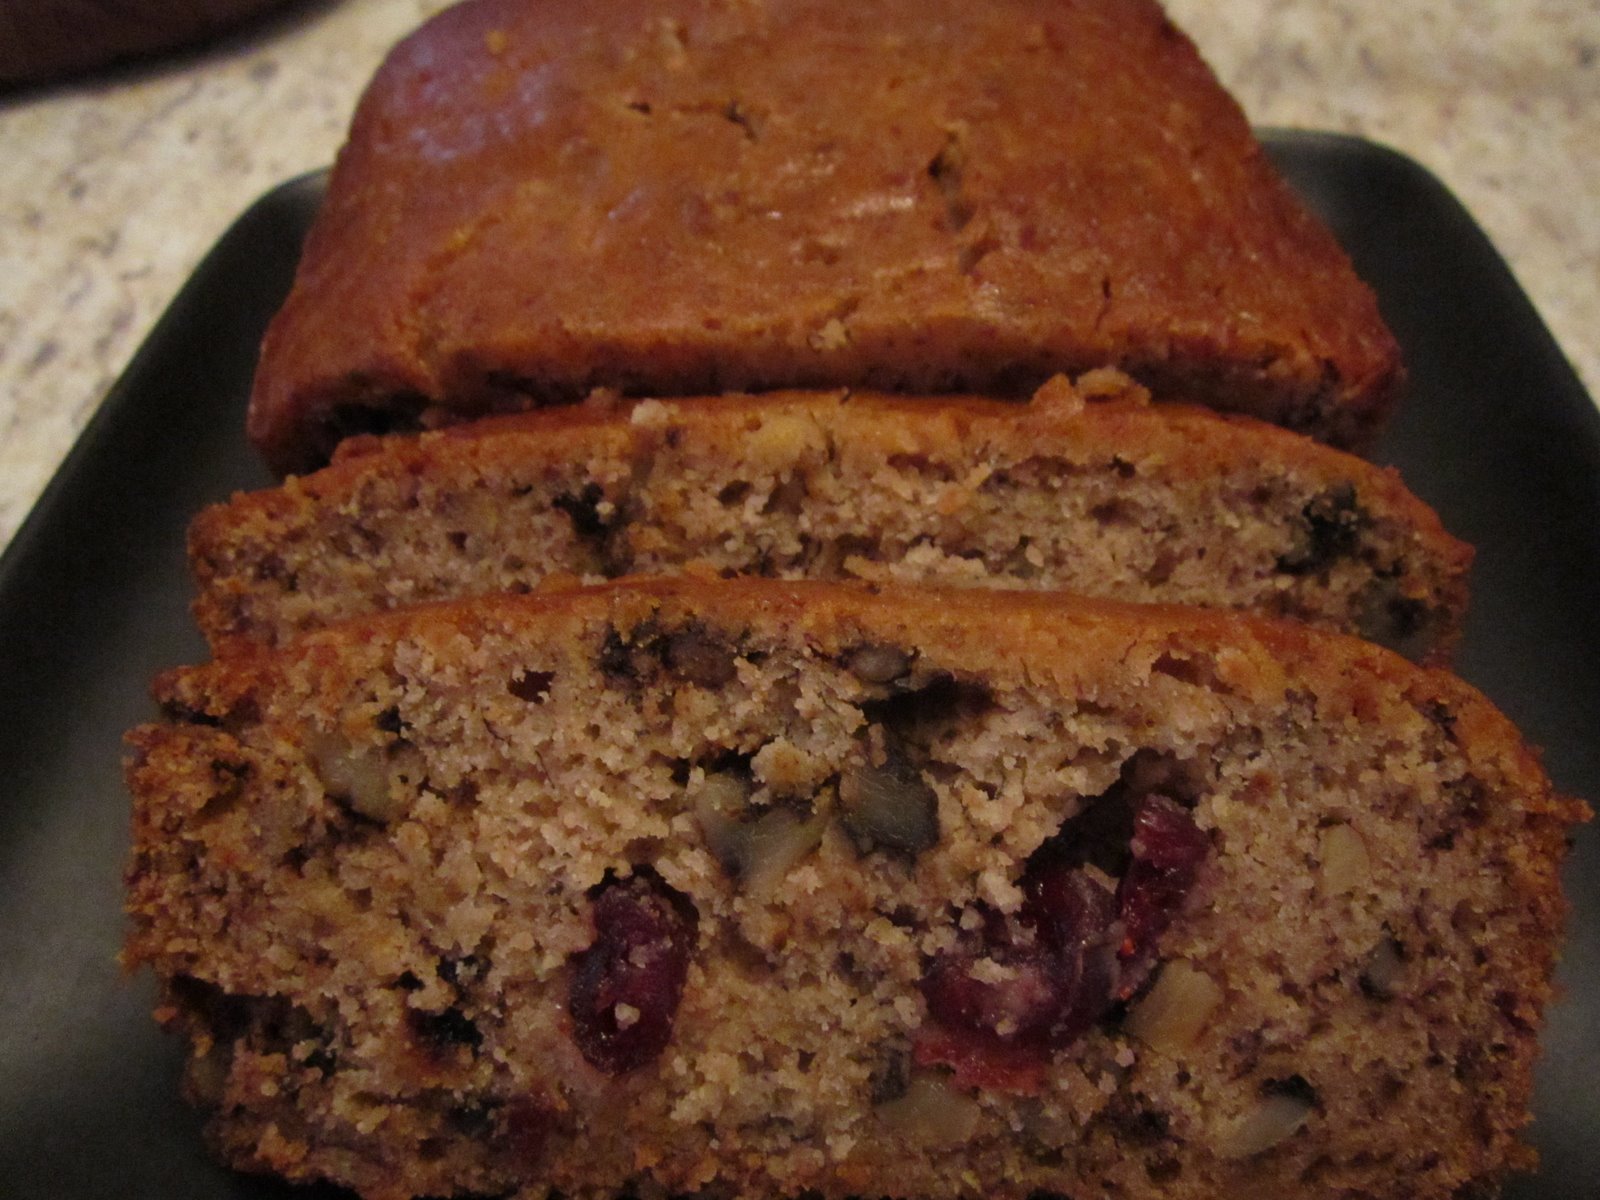
banana sour cream gluten-free bread
(PREP:  15 min /BAKE: 1 hr 15 min / COOL: 30 min or longer / SERVINGS: 1 loaf)
  • 1 tbsp. white sugar
  • 1/2 tsp. ground cinnamon or ginger (NOTE: ginger will give it a bite)
  • 4 tbsp. margarine or butter, softened
  • 1/3 c. white or brown sugar
  • 1 egg
  • 4 oz. sour cream
  • 2-3 ripe bananas, mashed (use the ones that are super soft and have black skins)
  • 1/2 tsp. vanilla extract
  • 1/2 tsp. ground cinnamon
  • 1/3 tsp. salt
  • 1 tsp. baking soda
  • 1-1/3 c. rice flour
  • 1/2 c. coarsely chopped
  • 1/2 c. mixed dried berries, chopped (Southern Grove mix of craisins, cherries, blueberries & strawberries is available for cheap in Aldi's)
  1. preheat oven to 300 deg. F while you lightly grease loaf/bread pan.  mix 1 tbsp. of sugar and 1/2 tsp. of cinnamon together and sprinkle all over the inside of greased pan.  set aside.
  2. in large bowl, briskly mix margarine, egg, and sour cream with whisk (or mixer) until creamy. mix in mashed bananas, vanilla extract, and ground cinnamon.  leave the mix relatively chunky from the mashed bananas.
  3. mix salt, baking soda, and rice flour into the banana mixture until thoroughly combined.  fold in chopped nuts and dried berries.  pour into loaf pan and bake in rack approx. 8 inches from bottom of oven.  the bread is ready when top is completely golden in color and a toothpick comes out relatively dry when poked through the center of the bread.  NOTE:  i say relatively dry because with the addition of sour cream, the toothpick will have some miniature pieces on it.  don't worry!  take it out after 65 min. of baking and cool...it'll be fine and thoroughly cooked.  if you leave the pan in longer than that, i fear your bread will come out quite dry.
  4. remove from pan after 5 minutes and cool the bread on a rack, dish cloth or plate for additional 25 minutes.  serve when you feel like it or freeze loaf for future use.


Tuesday, February 14, 2012

chocolate covered strawberries for Valentine's DaY

     hello cooking world!  i haven't been doing much cooking or baking (aside from my latest rendition of couscous on saturday for Dad's birthday lunch) while i've been out here in CaLi visiting family, so i apologize if the blog posts have been left wanting.  to remedy the situation (and send a hearty thank-you to bro D and in honor of valentine's day), i decided to concoct (with help from FoodNetwork's recipe chocolate covered strawberries) a version of the beloved favorite of foodie gifts this holiday:  huge strawberries + melted chocolate = a big smile from ANYONE!  ummm, unless they're diabetic or allergic to strawberries, then you'll have to think of something else.  these delicious treats tend to be quite expensive in stores to buy, so why not make your own?  and on a grad school budget, i'd rather make my own anyways.  added bonus is that they're super fast to make...maybe 15-20 minutes and DONE!
chocolate covered strawberries (EASY way)
(PREP: practically none / COOK: 15-20 min. / COOL: at least 45 min.)
  • 12 large strawberries with stems, washed and dried thoroughly
  • 2 4oz. Ghirardelli semi-sweet chocolate baking bars
  • a sheet of wax or parchment paper
  1. heat water (at least 3 inches high) in medium-sized pan on high heat.  while that's heating, make sure strawberries are washed and dried with paper towel.  set aside.
  2. break chocolate bars in pieces (use a knife if you must), but what i've found out with semi-sweet chocolate, you can break them with your fingers and put in small heat-resistant bowl.  you know, the kinds of bowls you can microwave and won't melt on itself.  NOTE:  i used a ceramic bowl and it did just fine. 
  3. once water is bowling, remove pot from heat immediately.  place bowl with chocolate in pot and allow to sit in the hot water for a few minutes, allowing for the chocolate to melt slightly.
  4. once you notice the chocolate pieces are melting, stir with a  fork until smooth.  remove bowl from pot.
  5. place parchment or wax paper on flat surface.  'prep' the each of the strawberries by gently pushing leaves upward towards stem so they don't get dipped into chocolate.  using your dominant hand, hold each strawberry by the stem close to the base and dip  the strawberry in chocolate filled bowl, turning it on its side so that chocolate covers the majority of the red skin.  make sure to allow the excess melted chocolate to drip back into the bowl from the strawberry before placing the fruit on its side on the wax paper to dry.  repeat for all strawberries.
  6. allow the covered strawberries to dry for at least 45 min. in room temperature.  i know that the FoodNetwork recipe says "30 min," but the chocolate hadn't hardened yet for mine.


Saturday, February 11, 2012

my style of couscous

  in the recent past, i've grown quite fond of couscous, so i made some for Dad's birthday/Sabbath lunch today in Calif.  i used the recipe (vegetarian Couscous) i used last week for our 'paper potluck', except i made a few additions and subtractions to it:
  • i added more mint and parsley to flavor it up
  • i did not add the red pepper (because i had none)
  • i used a mixture of craisins, regular and golden raisins
  • i added crumbled feta cheese (1/4 c.) to the mix
i know in the picture above, the couscous looks a bit moist (taken prior to putting the finished product in the fridge to cool); but once you have it chill for a bit, most of the moisture goes away.  it doesn't taste half-bad (i had a few spoonfuls while making it) and i hope the family enjoys it as well!  happy Saturday everyone!

Tuesday, February 7, 2012

'meaty' marinara sauce atop rotini, minus the meat

     craving a hearty meal for lunch, i wanted to make something quite filling.  instead of reaching for the typical bottle of Prego sauce that i'm quite fond of, i thought i'd go rogue: make my own marinara sauce.  from scratch.  this would be my first time and following more of my instincts (and what i've had left in the fridge) than a said recipe.  to add that 'meaty' feel of a thick sauce, i used a familiar meat substitute, TVP (Textured Vegetable Protein (TVP)) that can be found at any health food store (i bought mine at Potomac Adventist Book & Health Food Store). after a plateful of my creation, i am confident that it's good enough to share with you.
vegetarian marinara sauce with rotini
(prep: 10 minutes / cook: 40 minutes /servings: 6-8)
  • 3 medium vine tomatoes (more on the 'soft' side)
  • 1/4 c. fresh italian parsley, chopped
  • 1/2 c. fresh basil, chopped
  • 1 large can of crushed tomatoes
  • 1 c. dry TVP (i used 'beef' granules)
  • 4 tbs. water
  • 1 tbs. grapeseed oil (or oil of preference)
  • 2 tbs. low-sodium soy sauce
  • 1 tbs. brown sugar
  • 1 tbs. italian seasoning
  • 2 tsp. minced garlic
  • 1 tsp. paprika
  • crushed sea salt and crushed peppercorns to taste
  • crumbled feta cheese to top *optional
  • box of rotini or any other preferred pasta noodle 
  1. heat oil in medium heat.  saute garlic until golden.  add all seasoning, except soy sauce and brown sugar.  at same time, soak TVP in a bowl with enough water to cover all of the granules.  cook rotini pasta in separate pot (follow instructions on box/bag).
  2. drain TVP of excess water and add to oil and spices.  saute for 5 minutes, stirring occasionally.  add soy sauce and sugar.  cover pan and heat through for additional 5 minutes.
  3. add vine tomatoes, parsley and basil to pan.  saute until tomatoes are very soft (10 minutes).  mix occasionally.  add water and crushed tomatoes.  heat through until simmering (about 15 minutes).  add salt and pepper to taste.  reduce heat to low.
  4. add sauce over 'al dente' rotini and top with feta cheese and additional fresh basil leaves if preferred. NOTE:  al dente pasta is always the best way to cook your pasta, especially if your sauce has extra liquid.  this prevents the pasta from being soggy.

easy + unpretentious breakfast

i know that i've posted some 'heavy' breakfasts in the past, but not all my breakfasts are that 'fanciful.'  sometimes it's better to make the 'best meal of the day' an easy and unpretentious affair.  this morning was just that:  whole grain waffles, almond butter, slices of a granny smith apple and cafe bustelo espresso with 1 tbs. of half & half.  quick to make, healthy and quite filling.  who said i always eat like i'm the queen instead of a full-time grad student?

Monday, February 6, 2012

wait are those 'eggrolls'? no, they're 'lumpia' (vegetarian-version)

 one of the first things Mom ever taught me (besides how to say my prayers and try to not fight with my brothers) when i was at the tender age of 4, was to wrap lumpia, a Filipino appetizer, what most Americans call eggrolls.  for more than a quarter of a century, i've been making lumpia (or eggrolls).  as a family, we've made thousands for church potlucks, family parties, weddings, receptions, work events, and our own family dinners.  the typical lumpia has a pork or ground beef filling, but what i've always been taught was to substitute all meat for veggies.  besides, the vegetarian kind is healthier and (in my opinion) tastes better.  these eggrolls have always been a hit anywhere we've made them.  Mom + i have searched for decades for the perfect eggroll wrapper and we finally found the 'ideal spring roll wrapper' in the wei-chuan brand that can be found in any decent Asian supermarket (whether you're in Cali, the Washington DC area, the MidWest, or the Deep South).  you are free to choose another brand, but with fair warning:  they won't hold up (and keep your ingredients inside the wrapper) like these do.  take it from someone who's been doing this for most of her life (moi).  plus, they're low sodium and only 20 cal per piece. pooh-yah.
Vegetarian Lumpia (or Eggrolls)
(prep:  how ever long it takes you to chop veggies + mix / cook: 45 min. after oil heated /servings: 100 pieces)
  • 4 packs (25-pc each) wei-chuan spring roll wrappers
  • 5 small carrots, peeled and cubed small
  • 2 large russet potatoes, peeled and cubed small
  • 3 stalks of celery heart, chopped finely
  • 1 medium red onion, chopped finely (or yellow/white onion is fine)
  • 1/2 lb. bean sprouts
  • 1/4 medium-sized purple cabbage, shredded finely (or regular green cabbage will do)
  • freshly ground peppercorns to taste (or ground pepper)
  • 1 egg
  • 24 oz. vegetable oil (for deep-frying in medium-sized pot w/ lid)
  • mae ploy sweet chili sauce (for dipping)

  1. remove spring roll wrappers from freezer and defrost in fridge or if you don't have time, put each package in microwave for 30 seconds, so that wrappers are easier to separate.  separate wrappers and place on a plate.  NOTE:  though the the wei-chuan brand is made in the USA and also halal, it is wheat flour-based and not ideal for gluten-free diets.  i still have to find a gluten-free wrapper that's as good as wei-chuan.
  2. combine all vegetables and ground peppercorns in large bowl, then place in colander to drain excess liquid.  NOTE:  soggy eggrolls are caused by too much liquid in the veggie mixture or placing eggrolls in oil too long, especially when oil isn't hot enough.
  3. in small bowl, crack egg and mix slightly so that yolk is broken.  wrap eggrolls as directed on back of wrapper package, making sure that pressure is added enough with your fingers, so the roll isn't 'floppy' or become undone.  seal each roll w/ the egg yolk using a small fork.  NOTE:  as noted in the picture, the size of the eggroll is how you like it, but for mine, there's a picture of them next to a regular teaspoon so you have some idea how big my eggrolls are.  if not cooking immediately, you can freeze the finished wrapped eggrolls in freezer bag and place in freezer for no more than 6 months.  when ready to cook (DO NOT defrost), you can just follow step 4 and place frozen eggrolls directly into hot oil.
  4. if you can, heat the oil in pot on medium-high heat on stovetop while wrapping the eggrolls so that when you're done wrapping, you can drop them in the oil.  NOTE:  i've been wrapping eggrolls since i was 4-years-old (before i learned to tie my shoelaces), so i'm pretty fast (wrapping ~100 rolls/hr).  i don't expect you to be as fast, so i suggest you heat oil AFTER you wrap all the eggrolls.
     5.  you can fill the pot of oil with the eggrolls (~5-8 rolls at a time, depending how big of a pot you're using) and cook eggrolls until golden brown (not 'too light' or 'too brown').  this takes about 5-7 min. per filled pot.
     6.   using a metal tong, retrieve cooked eggrolls from pot and place on a plate with 2 layers of paper towels to soak up excess oil and to cool.  after it's not too hot and most oil soaked up, transfer to serving dish (that has one layer of paper towels in it).  NOTE:  when placing finished eggrolls on 'cooling plate,' make sure to place in single layer and not on top of each other.  this allows the eggrolls to cool efficiently and prevents the eggrolls from absorbing oil from the rolls on top of it.
      7.    serve with sweet chili sauce for dipping (i like mae ploy brand).  if not serving immediately or for transportation, cover eggrolls with a layer of paper towels and NOT plastic wrap or foil.  this maintains the 'crispiness' of the eggrolls and prevents sogginess.

'paper year' potluck

     this past weekend, my husband + i decided to throw our first potluck (see event happenings on 'PaPer Year' Potluckheld at our STL home to celebrate our first anniversary.  in lieu of gifts, we asked each of our guests to bring the recipe of their dish/dessert they would be contributing to the potluck; but some friends still brought cards and paper-based gifts as tokens of congratulations.
   M + i were so busy cooking up a storm (several appetizers, entree dishes and dessert), i forgot to take pictures of the food we made.  fortunately, i was able to snag a quick pick of the red velvet cake (M's favorite kind) i made in honor of my hubby.  since i was short on time and disliked the way my creamy icing turned out, i cheated and used store-bought vanilla icing to ice the cake.  other than that, i did the cake from scratch, using this Better Home & Garden's recipe:
Red Waldorf Cake
(prep: 1 hr/ bake: 30 min / cool: 1 hr / servings: 12)

  • 2 eggs (stand for 30 min. in room temp.)
  • 1/2 c. unsweetened cocoa powder
  • 2 oz. red food coloring (1/4 c....2 bottles of it)
  • 2 1/4 c. sifted cake flour or 2 c. sifted all-purpose flour
  • 1/2 tsp. salt
  • 1/2 c. shortening
  • 1 1/2 c. sugar
  • 1 tsp. vanilla
  • 1 c. buttermilk
  • 1 tsp. baking soda
  • 1 tsp. vinegar (i used apple cider)
  • 1 recipe for buttercream frosting (i used store-bought vanilla frosting)
  1. grease and lightly flour two 9-in. round cake pans; set pans aside. in small bowl stir cocoa powder and food coloring together and set aside; in another small bowl, stir flour and salt, then set aside.
  2. preheat oven 35o deg F.  in large mixing bowl, beat shortening for 30 sec. with a electric mixer, then add sugar and vanilla; beat with mixer until well mixed. add each egg one at a time and beat with mixer until combined.  beat in cocoa mixture.  add flour mixture and buttermilk alternatively and beat with mixer. stir in baking soda and vinegar.
  3. spread mixture equally in the two pans.  bake for 30-35 min. in round pans or until wooden toothpick inserted in the middle of the cake comes out clean.
  4. cool cakes in pans for 10 min., then remove from pans and cool cakes on wire rack for 1 hr.  frost cake as desired. NOTE:  can store cake (covered) in fridge for up to 3 days.
     other recipes (a mixture of vegetarian and meat/fish dishes) we used to make our portion of the potluck, we got online or from our BHG cookbook.
Key: V=vegetarian (not vegan); P=pescetarian (fish-based); C=carnivore (meat-based)